RC Discharger FAQ: Setup & Troubleshooting
RC Discharger FAQ helps you fix cycling problems and set up safely. Moreover, you reduce errors and protect your packs. Therefore, follow each step in order before you start a new cycle.
Quick safety checklist before any cycle
First, confirm pack voltage and cell count on your charger screen. Next, inspect balance leads and main leads for cuts or loose pins. Finally, start a short, low-current test and watch temperatures.
Additionally, place the pack on a non-flammable surface. Moreover, keep airflow around the charger and discharger. Consequently, you spot heat issues early and avoid damaged connectors.
ToolkitRC M8D cycle takes too long and end-voltage too low
If a cycle takes far too long, update ToolkitRC software to version 3.12. Consequently, you avoid known balancing behavior that slows cycle timing. Also, confirm the update finished before you run another cycle.
Next, download the firmware file here: ToolkitRC M8D v3.12 firmware download. Afterwards, reboot the charger and re-check the cycle time. Then, repeat one short test to confirm stable behavior.
iCharger soft reset during dual cycling
First, stop cycling if your iCharger reboots during dual cycling. However, that symptom often points to a missing C29 capacitor on the PCB. Next, open the case carefully and inspect the board for the C29 location.
Then, contact us if you cannot confirm the C29 part. In addition, update your iCharger to firmware v1.17 because it improves cycling stability. You can also order parts here: iCharger C29 capacitor fix kit for dual cycling stability.
Balance error in cycle mode on iCharger 456DUO, 458DUO, 4512DUO, DX6, DX8 and DX12
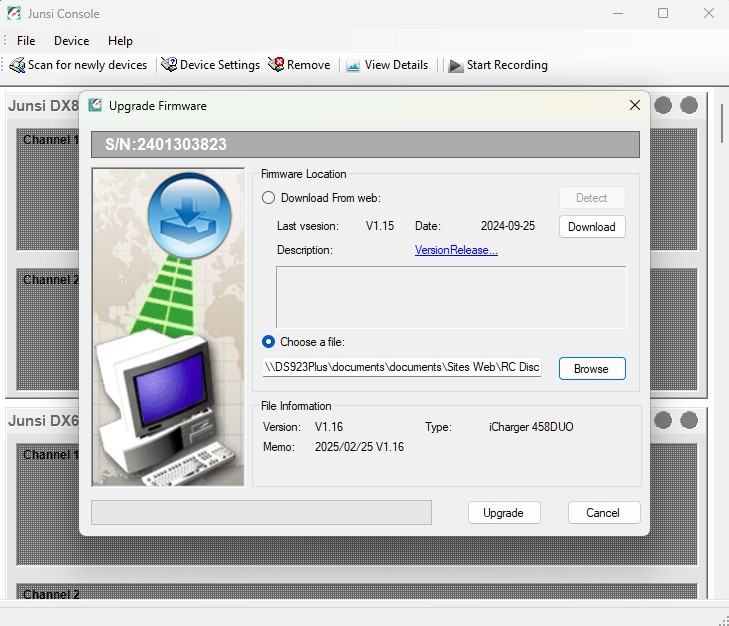
If you see a balance error in cycle mode, update the firmware next. Specifically, install the Junsi Console Setup software for iCharger updates on your computer. Then, power on your iCharger and connect a USB-C cable.
Afterwards, let the software detect the charger automatically. Next, click Device, choose firmware upgrading, and select your downloaded file. Finally, install firmware v1.17 and retry the same cycle settings.
Use the correct file for your model: iCharger 456DUO v1.19 firmware, iCharger 458DUO v1.19 firmware, iCharger 4512DUO v1.19 firmware, iCharger DX6 v1.19 firmware, iCharger DX8 v1.19 firmware and iCharger DX12 v1.19 firmware.
Moreover, review battery balancing methods for multi-cell packs to understand why the error appears. Therefore, you can match your cycle settings to your pack condition. Additionally, check balance plugs for bent pins before you blame firmware.
Slow discharge or cycle fails on iCharger 308DUO, 406DUO, 4010DUO, S6, X6, X8 and X12
If your charger discharges too slowly, update the firmware to the required version. Then, confirm the new version on the startup screen before you test again. If cycle mode fails on an iCharger X6, update to at least v2.13. Consequently, cycle functions typically return to normal after the update.
For v2.18, use: iCharger 308DUO v2.18 firmware, iCharger 406DUO v2.18 firmware, iCharger 4010DUO v2.18 firmware, iCharger S6 v2.13 firmware, iCharger X6 v2.13 firmware, iCharger X8 v2.13 firmware and iCharger X12 v2.13 firmware.
Synchronous mode with a Regenerative Discharger
Synchronous mode lets an iCharger DUO work smoothly with our regenerative discharger. First, go to Memory Setup. Next, open Option, then select Channel Mode, and choose Synchronous.
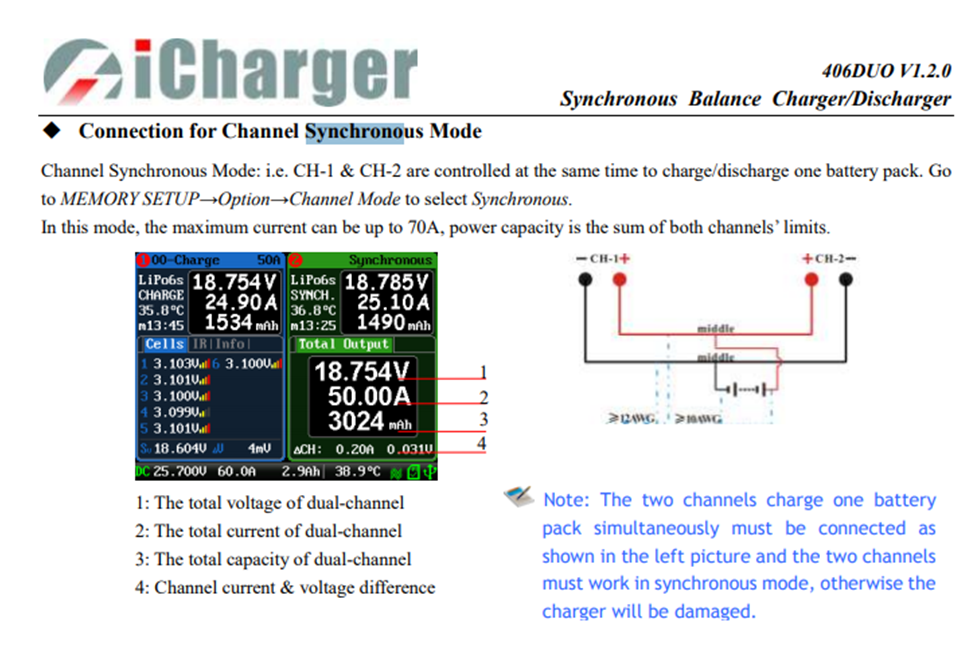
Importantly, use only 1S on our Regenerative Discharger 2S and 2S on our Regenerative Discharger 4S in Synchronous mode. Furthermore, never connect more than 2S because you can damage the regenerative discharger. Finally, run a short test cycle first, and then raise current once readings look stable.
Best practices for consistent results
Additionally, keep firmware current on every device in your pit setup. Moreover, label packs with IR and cycle count to spot changes early. Therefore, you gain more consistent runs and longer pack life.
RC Discharger FAQ also helps you build a repeatable routine. Ultimately, confirm cell count, verify wiring, and review settings before every session. Then, log results so you can compare performance across race days.